Wednesday 26 September 2012

Propagation: an easy guide


Heel Cutting
 In another life, I worked in plant nurseries and spent many hours with my colleagues propagating plants. We raised many thousands of plants by seed (which is another story). Today’s story is how to take a successful cutting.
In this instance I am taking rosemary cuttings, rosemary is fairly easy to grow from a cutting and a number of methods can be used.
This method of taking cuttings is called ‘heel cuttings’ you literally pull the side shoot off the main branch and leave a ‘heel’ on bottom of your cutting.

Have ready a sterilised container at least 4 inches deep, this could be an old plant pot or a propagating tray with drainage holes.  Fill with a cutting mix or pumice blend; this is available from your local garden centre. If you want to make your own cutting mix a 50/50 blend of potting mix and sand is a suitable substitute.

Fresh Rosemary
To get started, harvest your rosemary plant material in the morning if possible, and take semi-hard wood cuttings, think of it just like pruning the tops of your rosemary plant, you want branches about the thickness of a pencil with side shoots.
Once you have gathered your rosemary you can start stripping off side shoots, these will become your cuttings. A good length for your cutting is roughly the same size as your index finger (2inches)


Trimmed Rosemary Cuttings
You want to prune any flowers or excessive foliage to reduce water evaporation and stress on the cutting.
Once you have finished talking your cuttings you are now ready to place them in your cutting mix. Make a hole with a dibber stick, or a pencil, and then place your single cutting in the hole and firm the cutting mix around the cutting. It is important not to just push the cutting into the pot as this will damage the heel and retard the growth of new roots.

You can place the cuttings quite close together as this helps reduce water evaporation from the cuttings and they like each other.
Lemonbalm snug in their pot
Sprinkle with water as needed, at least once a day to ensure that the cuttings don’t dry out. Place the whole container somewhere warm and sheltered away from direct sun.
The cuttings will develop roots faster in spring/ summer and they could be ready for potting on within 6 to 8 weeks. You will know when they are ready by giving them a gentle pull and seeing if they are resistant, and by the development of new top growth.
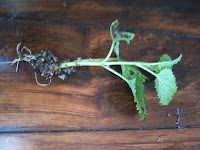

Lemonbalm ready for potting on
Gently remove the cuttings by inserting a small trowel or knife under the root structure and pot on into good quality potting mix and water.

Wednesday 28 March 2012

Herbal Oils


The herbs that grow in your garden can be made into herbal oils for use throughout the year.

depending on the herbs that you wish to use, you can make herbal oils during the summer and winter.
Today we are making valerian oil, with some valerian roots that were harvested and dried last winter.
We use Valerian oil as part of a massage rub to soothe restless legs and cramping.


Valerian
Valeriana Officinalis

Herbal oils are made in a similiar way to the herbal vinegars in previous posts.
Have ready a clean sterilised jar with a lid, the oil that you wish to infuse your herbs in and your plant material.
Today we are using valerian root and organic cold pressed olive oil.


  1. prepare your herbs ( make sure they are clean, free of other materials and water).
  2.  Chop your herbs into pieces roughly 2cm in length
  3. Place the chopped herbs in your clean jar, the tighter you pack the herbs, the stronger the oil will be.
  4. Pour over the olive oil, filling to the top
  5. Use a chopstick to clear any air bubbles in the oil
  6. Seal tightly, label with name and date.
  7. Place in a warm spot where you can check the jar for any leakage of oils and top up if neccessary.
After the herbs have infused for 4-6 weeks you will be able to decant them through a fine sieve, with the result being a beautiful medicinal herbal oil.


 Valerian, Chamomile and Calendula herbal oils getting made

Marvellous Marshmallow

Flowering Marshmallow


Marshmallow 
Althaea Officinalis

Our Marshmallow plant is flowering and we're excited that we will be able to harvest some Marshmallow roots to make marshmallow syrup this winter

This Marshmallow plant is into its second year of growth at our Herbal Dispensary garden.
The bees are loving it, they visit daily for their dose of Marshmallow goodness

If you don't have a Marshmallow plant in your garden you could try your local herbal supplier
I used to make a variation of this recipe when my children were little,it is a great soothing syrup for sore throats and coughs
My girls loved it!

Marshmallow Syrup
To make the syrup you need:
  • 110g of dried marshmallow root
  • 55g raisins
  • 4 litres water
  • 50 drops of orange flower water (optional)
  1. Boil the Marshmallow, raisins and water down to 3 litres
  2. Strain through a cheese cloth or coarse strainer (the mixture will be very thick)
  3. Add the orange water
  4. Pour into sterilised bottles or jars, and keep in the fridge.
This can be given in teaspoon doses as required


Wednesday 22 February 2012

Vinegar Vitality


Rosemary
Rosmarinus officinalis
At the end of Summer it's a good time to pick your culinary herbs and make them into vinegars. You can steep herbs, vegetables, fruit and even flowers in vinegar to extract and hold their aroma and flavours
Herbal vinegars can be used in cooking and salad dressings or taken directly as a daily tonic
They can also be used as hair rinses or added to a bath


Herbal vinegars can keep for at least six months and are usually made in a base of organic apple cider vinegar
Some herbs I like to use are Mint, Lavender, Tarragon, Thyme, Borage and Basil. Our next project is to make some Rosemary vinegar which is useful in cooking and also makes a good final hair rinse for people with darker hair and/ or problem scalps

Rosemary Vinegar
This is how I make my herbal vinegars, first you need to pick your herbs (we're doing Rosemary)make sure you pick in the morning when all the dew has dried, but before it gets too hot. A rough guide is three large stalks of Rosemary to two cups apple cider vinegar

Have a clean sterilised jar handy that you can put your rosemary into after it's been roughly chopped .  How tightly you pack the jar with your Rosemary will determine how much vinegar you add and also the strength of your rosemary vinegar

For culinary purposes add a little less herb, and for a hair rinse pack the herb more tightly
Make sure you fill the jar right to the top with vinegar so there are no gaps left for air.
You will need to use a plastic lid as the vinegar won't react to it


After you have sealed your jar, label and date it and leave to steep in a sunny place like a window sill, shaking once every few days. Leave the mix to steep for up to six weeks. For Culinary vinegars you can taste earlier to check the strength.  Once they have steeped long enough you can strain and decant the vinegar into a pretty bottle and add a small fresh sprig of herb if you wish.  Make sure you don't use any metal    ensils or lids when preparing the vinegar as it can react